October 19, 2012
-
Pumpkin Pies from Scratch and Wine bottle as roller
On the Thanksgiving weekend spent with family on Vancouver Island, beautiful weather and a field full of pumpkins from a local farm.
 Good fun making fruit and pumpkins pies and tarts
 totally from scratch and thought I would share some of my photos...even discovered if no rolling pin a wine bottle will do.
My pastry recipe..Granny's “No Fail” Pastry

Put one egg, 3T lemon juice and enough water to make one cup...mix and set aside in fridge. Sift together 1/2 t. baking soda, 5 cups flour, 2T sugar, 2 t. salt. slowly add 1 lb. of Tender Leaf lard, cutting into a consistency of oatmeal. Add egg mixture, mix lightly, form into a ball. Chill and use as needed. Makes 3 double pie crusts and extra dough can be frozen.
© Olga PayneSource: http://www.pickyourown.org/pumpkinpie.php
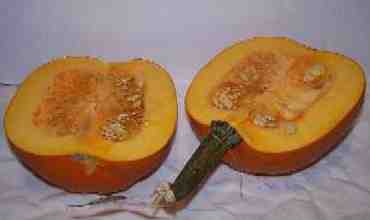
Step 1 - Get your pie pumpkin
 "Pie pumpkins" are smaller, sweeter, less grainy textured pumpkins than the usual jack-o-lantern types. Grocery stores usually carry them in late September through December in the U.S. In some parts of the country, they are also called sugar pumpkins or even "cheese pumpkins". Go figure that one. Note: the Libby's can of cooked pumpkin is just there for reference - it is the small can, so that gives you an idea of the size of a typical pie pumpkin. They're only about 6 to 8 inches in diameter (about 20 to 24 inches in circumference). TIP: If you're in a pinch and can't find a pie pumpkin, here's a tip: butternut squash taste almost the same! And many farmers will tell you that "Neck Squash", Jarradale Blue Hubbard, Cinderella and Long Island Cheese winter squashes are all considered to make a better tasting pumpkin pie. Commercial canned pumpkin is from a variety of butternut, not true pumpkins! If you insist on using a regular Jack O' Lantern type pumpkin, you may need to add about 25% more sugar and run the cooked pumpkin through a blender or food processor to help smooth it out.
Just like selecting any squash, look for one that is firm, no bruises or soft spots, and a good orange color. One 6" pie pumpkin usually makes one 10 inch deep dish pie and a bit extra; or two 9 inch shallow pies! If you have extra goop, you can always pour it into greased baking pans and make a crustless mini pie with the excess (and the cooked pies do freeze well!)
If you live in the Far East (Thailand, Japan, Korea, Hong Kong, etc.) and cannot get a pumpkin or a butternut squash, I'm told that Japanese pumpkins make a great substitute. Just cube the meat into small cubes and steam them for 35 minutes. The rest of the preparation is the same and I'm told the taste is great.
Step 2 - Prepare the pumpkin for cooking
 Wash the exterior of the pumpkin in cool or warm water, no soap.
Cut the pumpkin in half.
 A serrated knife and a sawing motion works best - a smooth knife is more likely to slip and hurt you!

Step 3 - Scoop out the seeds...
And scrape the insides.
 You want to get out that stringy, dangly stuff that coats the inside surface. I find a heavy ice cream scoop works great for this.
Note: SAVE THE SEEDS:

The seeds can be used either to plant pumpkins next year, or roasted to eat this year! Place them in a bowl of water and rub them between your hands. then pick out the orange buts (throw that away) and drain off the water. Spread them out on a clean towel or paper towel to dry and they're ready to save for next year's planting or roast.
Step 4 - Cooking the pumpkin
There are several ways to cook the pumpkin; just choose use your preferred method. Most people have microwaves and a stove, so I'll describe both of those methods here. But others make good arguments in favor of using a pressure cooker or baking in the oven. At the end of this document, I’ve included alternative instructions to replace step 4, if you’d rather use a different method.
Method 1 - Bake in the oven
You can also bake the prepared pumpkin in the oven, just like a butternut squash. This method takes the longest. Basically, you cut and scoop out the pumpkin as for the other methods, place it cut side down into a covered oven container. Cover the ovenproof container (with a lid), and pop it in an 350 F (165 C) oven. It normally takes about 45 minutes to 90 minutes (it can vary a lot!); just test it periodically by sticking it with a fork to see if it is soft!
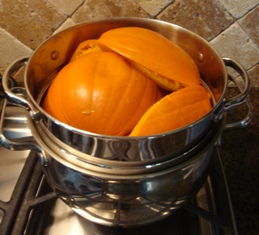
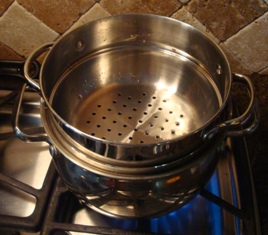
Method 2 - Steam on the stovetop
You can also cook it on the stovetop; it takes about the same length of time in a steamer (20 to 30 minutes). I use a double pot steamer, but you could use an ordinary large pot with a steamer basket inside it!:

Put it in a microwaveable bowl
Remove the stem, and put the pumpkin into a microwavea
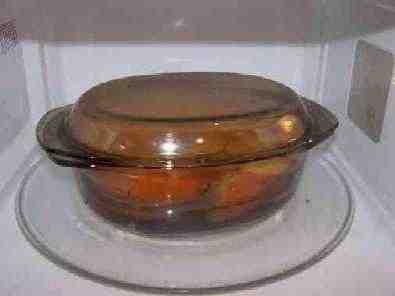 ble. You may need to cut the pumpkin further to make it fit. The fewer the number of pieces, the easier it will to scoop out the cooked pumpkin afterwards.
Put a couple of inches of water in the bowl, cover it, and put in the microwave. I cook it on high until it is soft. That may take 20 minutes or more, so like anything else, try 15 minutes, see how much it is softened, then do 5 minute increments until it is soft
Cook the pumpkin until it is soft
Whichever method you use, cook the pumpkin until it is soft and will separate from the skin.
Step 5 - Scoop out the cooked pumpkin

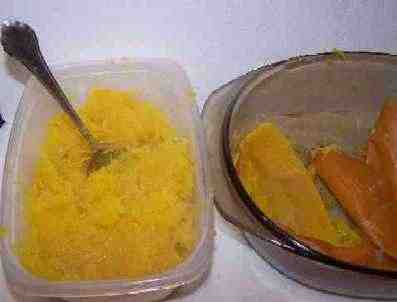 Whether you cook the pumpkin on the stove, microwave, or even the oven, once it is cooked until it is soft, it is easy to scoop out the guts with a broad, smooth spoon, (such as a tablespoon). Use the spoon to gently lift and scoop the cooked pumpkin out of the skin. It should separate easily an in fairly large chucks, if the pumpkin is cooked enough.
Many times the skin or rind will simply lift off with your fingers (see the photo at left) . I'll bet you didn't realize making your own pumpkin glop... err, "puree" was this easy!
Note: there are many varieties of pumpkin and some make better pies that other (due to sugar content, flavor, texture and water content. Drier, sweeter, fine-grained pies; the small (8" across) ones called "pie pumpkins" are best.
THIS is the best photo...drinking Alley Kat beer called PUMPKIN PIE!

Recent Comments